My favourite inventory script

UPDATE: New script download link here.

Last week I received one of the most dreaded emails ever. It began with “can you please fill out an inventory spread sheet for this customer?”. I’ve been through a fair few IT jobs and whether I worked for a small or large company documentation was never their strong side so I pretty much knew I’d have to do it from scratch. Luckily I came across Jesse Hamrick’s script on the powershellpro site. You can download my edited version here.

I’ve only made a couple of modifications to the original script:

1. Replaced 1024 / 1024 with 1GB to get RAM etc. in GB instead of MB and updated the spreadsheet headers accordingly.

2. Excel 2013 only creates one worksheet rather than three when you open a new workbook so you’ll end up missing two sheets (networking and disks). To create the two additional sheets I’ve inserted  two more lines of $Sheet = $Excel.Worksheets.Add().

And that’s it. You can obviously tweak this as much as you want but Jesse’s original script pretty much does everything I need it t do.

Below is an example of the spread sheet it produces:

This slideshow requires JavaScript.

Symantec Endpoint Protection Manager 12.1 Password Reset

UPDATE: SEPM 12.1.5 and higher

A few kind people reported that this doesn’t seem to work with 12.1.5. I have tested the script with 12.1.6 and it still works however you might need to set the JRE_HOME system variable first.

To do this:

  1. Navigate to the “Advanced System Settings” section of the Control Panel.
  2. In the “System variables” section of the Environment Variables window that opens, ensure that the JRE_HOME environment variables are pointed at the following location:  C:\Program Files\Java\jre<version>
  3. Click OK and Apply to close the System Properties Window.

You can check it worked if you try going to %JRE_HOME% and end up in the folder you’ve just set.

If you run into any problems do comment below.

UPDATE: Download the script from here: https://www.dropbox.com/s/sofc89su1552rj4/resetpass.bat?dl=0

I’ve spent some time today trying to reset the admin account for Symantec Endpoint Protection Manager. In earlier versions you could use resetpass.bat file as detailed in http://www.symantec.com/business/support/index?page=content&id=HOWTO18134. However for greater security Symantec haven’t included this utility in version 12.1. Instead you can use the Forgotten Password link on the logon screen. The main problem is that if you haven’t set up email server settings in the Manager console previously this won’t be any help to you.

Quite a few forum posts suggest logging a support case with Symantec to obtain a new version of the resetpass.bat file but I couldn’t find anybody actually offering this up for download so I thought I’d share the love and save other people logging support calls:

@echo off
setlocal

set CATALINA_HOME=%CD%..\tomcat
set JRE_HOME=%CD%..\jre

“%JRE_HOME%\bin\java.exe” -Xms64m -Xmx256m -XX:MinHeapFreeRatio=30 -XX:MaxHeapFreeRatio=40 -classpath “%CD%..\bin\inst.jar;%CD%..\bin\inst-res.jar” -Dcatalina.home=”%CATALINA_HOME%” -Djava.library.path=”%CATALINA_HOME%\bin;%CATALINA_HOME%..\ASA\win32″ com.sygate.scm.tools.DatabaseFrame setpassword admin admin
endlocal

You can download the file here: resetpass.bat or just copy and paste into notepad and save as resetpass.bat in \Program Files\Symantec\Symantec Endpoint Protection Manager\Tools folder

You will need to run this from command prompt with admin priviledges and your admin login will be set to:

username: admin
password: admin

No XenDesktop license available?

Issue:

User can’t connect to XenDesktop, the session launches initially but stops at “Preparing your desktop” and then closes without any errors.

Event log errors on XenDesktop controllers:

No connection license available. To resolve, free licenses by closing sessions that are not needed, or add more licenses. Details: 
License Server Address: ‘LicenseServer.domain.local’ 
License Server Port: ‘27000’ 
Desktop ID: ‘CD8A4005’ 
User: ‘Domain\Username’ 
Client ID: ‘6F713A64’ 
Desktop Kind: ‘Shared’

Citrix Desktop Studio – Licensing:

image

If you’re scratching your head at this point thinking there’s no way you are using more licenses than you have the most likely cause is that Citrix Licensing Server allocated a few licenses to devices instead of users.

Citrix licensing server has a complicated algorithm for working out which type of license is going to work best for each session and allocates the license accordingly. Unfortunately this doesn’t always that well.

To check how you’re licenses are allocated logon to your license server, open command prompt and run

C:\Program Files (x86)\Citrix\Licensing\LS>udamin.exe –list

This will display all currently allocate licenses and look something like this:

image

As you can see there are 8 licenses allocated to devices which we need to delete using:

C:\Program Files (x86)\Citrix\Licensing\LS>udamin.exe –f XDT_PLT_UD –device 255C42F8 -delete

image

Just repeat this for each device name in the list and your license allocation should be back to normal.

XenServer tools install hangs after reboot

As promised this is a continuation of my previous post where I described the pain of trying to install XenServer tools on an SBS server, BSOD and the recovery. Hopefully you’re not at the BSOD point yet and just staring at a XenServer tools install that isn’t progressing at all.

If that’s the case you can cancel the installation but before you reboot your server there are two things to do:

1. Remove XenServer tools from Control Panel – Programs and Features.

2. Stop and disable the Exchange Transport Service

After this you can reboot the server, reinstall XenServer tool within minutes and all is fine.

I have so far failed to find any Citrix KB articles to this effect but it will definitely save you a lot of problems.

In my case this was an SBS server but if you’re not running Exchange it might be worth stopping/disabling all non essential services.

XenServer Tools Nightmare

I actually really like XenServer but some things are just plain annoying. The list of annoying things is fairly long and this is my latest addition. Following a very straight forward upgrade from XenServer 6.0.2 to 6.2 which has gone far smoother than I expected even though without license you have to use CLI to install updates I have done the next logical thing – started updating XenServer tools on all VMs. First couple machines couldn’t have been easier but the problems came on the last one which didn’t have XenServer tools installed at all – and I soon learnt why.

After the first part of the install the server (SBS 2008) asked for a reboot after which the installation continued – apart from the fact that it didn’t really and just appeared to be stuck. I am a fairly patient person but when the installer didn’t move for an hour, no errors anywhere to be seen and the client getting a bit frustrated that their SBS server had no network connection (due to the MS drivers being replaced with Xen PVS driver) I have decided to cancel the install. This has taken a few minutes and then asked for another reboot. When the machine rebooted I got the not so lovely BSOD 0x0000007B.
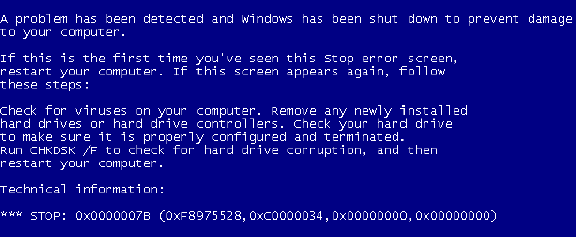
BSOD7B

Citrix KB articles just tell you to use Last Known Good configuration or Safe Mode – neither of which worked in this case.

After much research and starting a backup import from the previous night I have come across the solutions below which worked a treat:

1. Boot from installation media.

2. Select Repair your computer.

3. Enter command prompt.

4. Navigate to c:\windows\system32\config

5. reg.exe load HKLM\TEST system

6. Locate and delete LowerFilters MultiSZ scsifilt from HKEY_LOCAL_MACHINE\Test\ControlSet001\Control\Class\{4D36E967-E325-11CE-BFC1-08002BE10318\

I have just searched for “scsifilt” and found it in ControlSet002 as well and deleted.

7. Disable the following services by setting the Start value to 4:

[HKEY_LOCAL_MACHINE\Test\ControlSet001\Services\scsifilt / xenevtchn / xenvbd / xensvc

8. Close registry editor and unload the hive: reg.exe unload HKLM\TEST

9. Restart the machine and you should be able to boot into windows normally.

What actually causes this issue is the partial installation of XenServer tools leaves some drivers on the system: scifilt, xenevtchm, xenvbd, xensvc.

So at this point my server is up and running again albeit with no XenServer tools. Which will be the subject of my next post.

Attachments not visible in Outlook 2010

Even though multipart messages have been around for ages and generally the features and interoperability across all sorts of email clients are pretty good I often come across issues where in particular Outlook can’t quite handle certain content types.

On this occasion the problem was such that emails with attachments from a particular sender were getting delivered fine but the recipient couldn’t see the attachments anywhere even though the message size clearly suggested there should be some. After some quick investigation it became apparent that while Outlook 2010 didn’t display the attachments OWA did albeit without showing the usual paperclip icon next to the message. Users were also able to see the attachments on their blackberries. This suggested that the issue lies within outlook (2010 in my case but it later transpired that Outlook 2007 would do the same).

Quick google revealed a KB article which pretty nicely matched my problem. The problem is with Exchange not validating reference to an inline attachment and hiding the attachment. I have followed the resolution steps:

  1. Stop the Exchange Transport service.
  2. Locate the EdgeTransport.exe.config file. This file is located in the following path:  <drive> :\Program Files\Microsoft\Exchange Server\Bin\
  3. In the EdgeTransport.exe.config file, add the following entry between the <appSettings> element and the </appSettings> element: <add key=”TreatInlineDispositionAsAttachment” value=”true” />
  4.  Restart the Transport service.

After getting the affected sender to resend the message the attachments were displayed but no paperclip in the navigation pane. I was a little bit intrigued as to why would Exchange regard the attachments as inline in the first place when I knew these were individual attachments. To get to the bottom of this problem I have compared the headers of two messages – one that was displayed correctly and one without the paperclip. Messages from the affected senders had the Content-Type header value as multipart/related while a normally displayed message would be multipart/mixed. You can find all the details on RFC2387 here but to get to my point the use of multipart/related isn’t correct in this scenario where the recipient is expected to view individual attachments.

Exchange considers all attachment parts inside multipart/related as inline attachments which should be accessible from inside the body and therefore hides them from the attachments list which explains why the first solution worked but suggests a nicer solution.

Since the MIME is malformed we really should be fixing the original message format. In most cases you will have no control over the sender’s infrastructure so the only option left is creating a hub transport rule on your Exchange server to change the content-type value from multipart/related to multipart/mixed:

  1. Launch Exchange Management Console
  2. Expand Organization Configuration, and select Hub Transport
  3. Select New Transport Rule … in the action pane
  4. Give the rule a name (ex. Change Content-Type)
  5. Select When the message header contains text patterns
  6. Under message header enter Content-Type and multipart/related under text patterns. Click Next.
  7. Select Set header with value and enter Content-Type as header.
  8.  Enter multipart/mixed as value and click Next.
  9. You don’t need to create any exceptions (unless you want to).
  10. Click finish to complete the rule creation.

With this solution you should have the message display nicely including the paperclip in Outlook navigation pane.

The joys of SCCM or How difficult is it to get an inventory report

It all started with the simple thought of getting a list of all PCs at my work with some pretty basic info like the computer name, model number, OS….I didn’t think I was being too demanding especially knowing I can put SCCM to work. I was in for a major surprise or disappointment when I found that no such report comes with SCCM and you have to build a custom report.

In the spirit of not reinventing the wheel and with the hope of not being the only person on the planet that ever wanted to do this (not to mention my less than impressive skills when it comes to SQL) I have enlisted the help of the online community. Fortunately I have found enough information to get me started and in the end came up with the following query:

SELECT  distinct
CS.name0 as ‘Computer Name’,
CS.domain0 as ‘Domain’,
v_R_System.Last_Logon_Timestamp0 as ‘Last logon’,
v_R_System.User_Name0 as ’ Username’,
BIOS.SerialNumber0 as ‘Bios serial’,
SE.SerialNumber0 as ‘System Enclosure serial’,
CS.Manufacturer0 as ‘Manufacturer’,
CS.Model0 as ‘model’,
OS.Caption0 as ‘OS’,
RAM.TotalPhysicalMemory0 as ‘Total Memory’,
sum(isnull(LDisk.Size0,’0’)) as ‘Hardrive Size’
from
v_GS_COMPUTER_SYSTEM CS right join v_GS_PC_BIOS BIOS on BIOS.ResourceID = CS.ResourceID
right join v_GS_SYSTEM SYS on SYS.ResourceID = CS.ResourceID
right join v_GS_OPERATING_SYSTEM OS on OS.ResourceID = CS.ResourceID
right join V_GS_X86_PC_MEMORY RAM on RAM.ResourceID = CS.ResourceID
right join v_GS_Logical_Disk LDisk on LDisk.ResourceID = CS.ResourceID
right join v_GS_SYSTEM_ENCLOSURE SE on SE.ResourceID = CS.ResourceID
right join v_R_System on v_R_System.ResourceID = CS.ResourceID
where
LDisk.DriveType0 =3
group by
CS.Name0,
CS.domain0,
v_R_System.User_Name0,
v_R_System.Last_Logon_Timestamp0,
BIOS.SerialNumber0,
SE.SerialNumber0,
CS.Manufacturer0,
CS.Model0,
OS.Caption0,
RAM.TotalPhysicalMemory0

The resulting report looks something like this:

Capture

Bear in mind that this report doesn’t provide real-time information and based on your SCCM inventory settings can be out by quite some time. For example my Heartbeat discovery only runs once a day so data like last logon can be outdated.