Just a quick post today. If one of your Office365 users suddently can’t login to Outlook 2010 (most often after password change) and you’re absolutely sure the password you’re using is correct, i.e. you can sign into outlook.office365.com and lync give this update a go: http://www.microsoft.com/en-us/download/confirmation.aspx?id=29361 . It’s worked a treat for me today!
Author Archives: Kat
Cisco IPsec VPN and Windows 8
I think I may have finally found a solution to my problems with IPsec VPN on Windows8. When I first installed Windows8 the Cisco IPsec VPN client worked fine for some time – I’m not exactly sure how but it did. Unfortunately after a few weeks while I could still connect to the VPN I couldn’t actually access anything across the tunnel. RDP, ping…nothing would get through.
I resorted to using Shrew Soft VPN client for a while which mostly worked but I found with some VPNs it just wouldn’t connect and I would have to use a Windows7 VM to connect to those. Today I have decided to revisit the whole situation and came accross this post .
I didn’t have the Cisco VPN client installed at that point so went straight onto installing Citrix DNE. But if you already have the client you might want to install it first.
1. Download and install Citrix DNE.
2. Install Cisco IPsec client.
That’s all you should need to do but I’ll report back after a few weeks just in case it mysteriously breaks again. In the meantime if anyone has a better solution I’d be really glad for it.
Unexpected transaction log file growth (Exchange)
I’ve recently spent a considerable amount of time trying to figure out why a client’s transaction logs were growing at the rate they were. I am talking 50GB worth of logs for one store every day. There really wasn’t anything warranting such growth. The usual things that came to mind like inbound/outbound spam issue didn’t apply. I have done a message tracking search to confirm this and with hindsight I should have really spotted the issue at that very point.
I have limited my search to a specific time period – but I would get a few messages showing sent date outside of the range. This was because the range you set in message tracking is when the message was logged – not when it originated. For some reason I decided not to pay any attention to this and persevere with some transaction logs analysis.
Scott Oseychik’s guide on transaction log analysis is great for this:
- Download the “Unix for Win32” utilities fromhttp://downloads.sourceforge.net/unxutils/UnxUtils.zip?modtime=1172730504&big_mirror=0
- Extract all files from the UnxUtils\usr\local\wbin subsirectory to C:\UNIX
- Download strings.exe fromhttp://www.microsoft.com/technet/sysinternals/Miscellaneous/Strings.mspx, and place strings.exe into C:\UNIX
- Make a C:\TMP directory (Unix tools need a Win32 equivalent of /tmp)
- Make a directory for all your transaction log files (i.e. D:\customers\test), and place all the logs in this dir
- From a cmd prompt, navigate to your C:\UNIX dir
- Run the following command:
strings -q -n 16 D:\customers\test\*.log | cut -f3 -d: | sort | uniq -c | sort | tee c:\log-output.wri
If you open the wri file (just use a text editor of your choice) you get a list of 16 character strings sorted from the least number of occurrences to the largest. While this won’t tell you exactly what the problem is it will definitely point you in the right direction.
In my case I had a totally ridiculous number of “Out of Office Reply” – so much so the next highest expression wasn’t anywhere near it. At this point it finally occurred to me that the messages “randomly” showing in message tracking were the culprit. While they may have been sent a while ago they were still looping on the Exchange server and constantly generating new transaction logs and coming up in each message tracking search.
Now I just had to stop these messages by disabling the automatic reply on each offending mailbox. As usual in hindsight it sounds very simple.
RSA server time out of sync and users prompted for next token code or authentication failing
If the RSA server time is out by more than 3 minutes you will find some users completely failing to authenticate and some being prompted for the next token code. Once you correct the server time it is good to resynchronize all the tokens. I have run this batch job on a windows server but I’ll include instructions for UNIX based and appliance as well.
Windows:
1. From command prompt run:
C:\Program Files\RSA Security\RSA Authentication Manager\utils>rsautil sync-tokens -I
2. You’ll be prompted for a a few bits of information including the path for the output file. The whole process should look like this:
Authenticator Bulk Synchronization Utility am-7.1.0-build20080715085805
Copyright (C) 2008 RSA Security Inc. All rights reserved.
Enter the absolute path for the output report file : c:\sync.txt
Enter the base security domain name for recursive search [(none)]: none
Enter the type of token selection [ (all) | file ]: all
Choose a token filter [ assigned | unassigned | (both) ]: both
What action do you wish to perform? [ (list) | modify ]: modify
Enter type of clock offset value [ absolute | relative | (none)]: absolute
Enter clock offset value [0]: 0
Do you want to reset the Next Tokencode Mode? [ y/n ]: y
Do you want to reset the last login date and time? [ y/n ]: n
Do you want to clear user lockout information? [ y/n ]: y
Enter administrator user ID : admin
Enter administrative password : ***********
Authenticator Bulk Synchronization Utility am-7.1.0-build20080715085805
Copyright (C) 2008 RSA Security Inc. All rights reserved.
Started job on Wed Aug 20 10:19:51 EDT 2008 with ID = ims.e07c584ba263650a018d923bd0ac085d
3. That’s all you need to do. You can check the output file to get a list of tokens that were modified and their current status.
RSA Authentication Manager 7.1 – Applicance and UNIX based
I haven’t tried this so don’t take my word for it but it is the procedure from RSA support so hopefully not completely useless.
1. Connect to the Appliance using the console or an SSH client. (For remote access using an SSH client, verify in the RSA Operations Console that the Appliance is enabled for SSH connectivity.)
2. Log on using the emcsrv account and the Operating System password.
3. Switch users to root. Run: sudo su
4.When prompted, enter the Operating System password.
5. Switch users to rsaadmin. Run:su rsaadmin
6. Set the current directory to the folder that contains the RSA utilities.
Run: cd /usr/local/RSASecurity/RSAAuthenticationManager/utils
7. Set the environmental variables. Run: . ./rsaenv (This command begins with a period, space, period, and forward slash)
8. Set the correct time on the RSA Authentication Manager server.
9. Synchronize the tokens:
10. (Recommended) Create a text file where you can write output from the command. On the Appliance, a convenient location is /tmp/sync.txt.
11. Run: ./ rsautil sync-tokens -I (Run this command as rsaadmin.)
Cannot access auto-mapped mailboxes after applying Update Rollup 5 for Exchange 2010
This update has been around since February but I’ve only come across this recently.
Symptoms
Users get “The set of folders cannot be opened” error in outlook when trying to access an additional mailbox automapped from Exchange 2010. The same users can access the mailbox if it is added manually (through Account Settings). Other users may be unaffected all together.
Cause
It appears that following the rollup update 5 automapped mailboxes can only be accessed using Outlook SP2 and higher. If you check your office version number you’ll likely find you’re either on RTM or SP1.
Office 2010 RTM 14.0.4763.1000
Office 2010 SP1 14.0.6029.1000
Office 2010 SP2 14.0.7015.1000
Resolution
Update MS Office to SP2.
Using SAN certificates for Jabber
This is bit of a continuation on my previous post SSL Certificates for Jabber where I have mentioned the main downside to using public CA for your certificates is the cost. It has probably crossed your mind if you could maybe use a wildcard or SAN certificate. With the wildcard the answer is simple – no. Refer to enhancement Cisco bug ID CSCta14114.
SANs are supported but won’t really help you with reducing the number of certificates you need to buy. You can use them if you’d like your clients to use multiple URL’s to access the same server – for example internal and external domains but you still need to create a CSR on each server and then submit a corresponding CA certificate for each one. Unfortunately there’s no way of importing the SAN certificate’s private key to either the IM and Presence or CUCM servers as you might be used to with Windows IIS or other devices.
This all makes using your Enterprise CA as a more attractive option all together with the only sticking point being devices not joined to the domain (particularly mobile devices) and how to make them trust your internal CA. For some people this may not be an issue and you might be quite happy accepting the certificate warning initially but I’m yet to find a straight forward solution to this.
Deleting local user profiles
This is more of a one off utility to use when things go wrong but using GPO to delete profiles over a certain age is much tidier. I needed to clear all profiles (even the ones that were used on the same day). The story why it got to this point is quite long but lets just say that if you’re moving redirected folders to a different server definitely make changes to your GPO first.
Some useful articles on this:
http://www.microsoft.com/en-gb/download/details.aspx?id=5405
http://social.technet.microsoft.com/Forums/en-US/4e7df397-7b93-41ab-8448-2503c63568f6/how-to-move-redirected-files-from-one-server-to-another?forum=winserverGP
So if for any reason you’d like to delete local user profiles from a bunch of PCs you will definitely find the Delprof utility useful. For Windows XP and lower you can download to file from Microsoft. You will however notice that this is no good for Windows 7, that’s where Helge Klein’s Delprof2 comes in handy. The software is free to use for non-profit and educational organisations which nicely covered my client. The commercial license costs around £260 which isn’t that small amount but if you’re going to get some use out of it it’s not ridiculous either.
I had nearly 900 PCs to contend with and wanted to run delprof2 against a list of PC names. For this purpose I’ve written a fairly simple batch file, which no doubt could be much improved but it did the job quite nicely.
@echo off
del /q log.txt 2>nul
del /q errorlog.txt 2>nulfor /f %%i in (pclist.txt) do call :proc %%i
goto :end:proc
echo processing %1 …ping -n 2 %1 >nul 2>nul
if %ERRORLEVEL% gtr 0 (
echo -offline
echo %1 -offline >>errorlog.txt
goto :EOF
)echo deleting on %1
echo deleting on %1>>log.txtDelProf2.exe -c:%1 -i -q
echo %1 Complete
echo %1 Complete>>log.txtgoto :EOF
:end
This script assumes there’s a PClist.txt file containing a list of computer names (IP addresses would work too) and delprof2.exe in the same directory as the batch file itself.
SSL Certificates for Jabber
This week I’ve ventured out of my comfort zone while helping out with the Microsoft side of things on a Cisco Jabber project. First of all I’d like to point you to this document: Jabber Complete How-To Guide for Certificate Validation. While not the clearest of all it does contain everything you need to know. I had to read it a couple of times to completely understand what needs to be done so here is my own summary.
You can take three approaches with certificates but whichever method you go for to have any chance of the certificate being verified by the client device you need to make sure you have A records created for each server and then using the FQDN rather than IP addresses in a fair few places as listed in the Cisco article. Otherwise you’d end up with a mismatch between the server address and the certificate.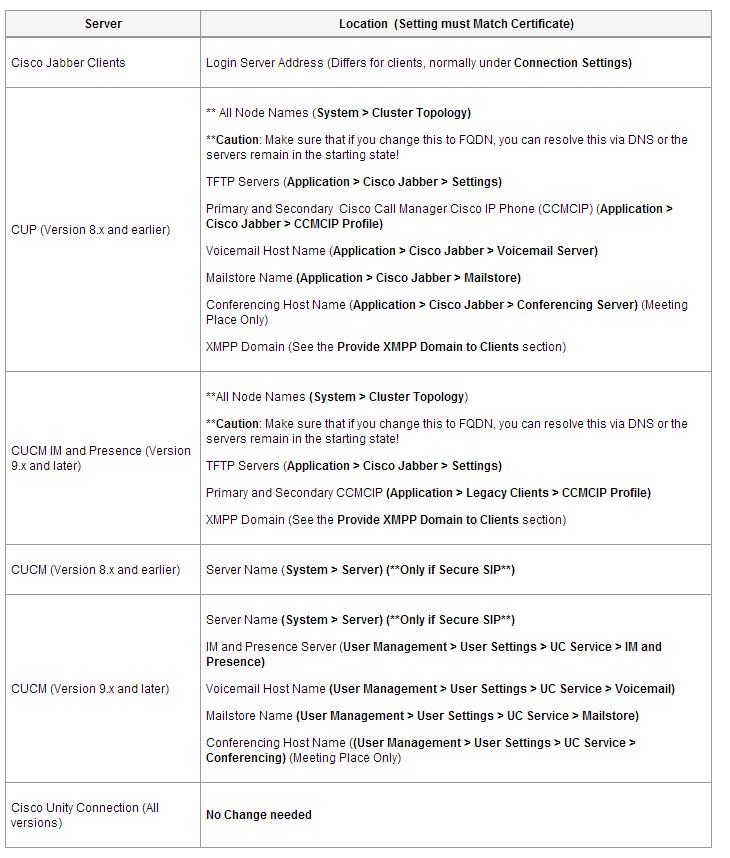
- Use the default self signed certificates from each server (Cisco Unified Communications Manager IM and Presence, Cisco Unified Communications Manager,Cisco Unity Connection).
This is quite simple as you don’t need to generate any new certificates at all. You just need to find a way of making your devices trust these. - Use private CA to sign the certificates.
This is the route we went down. The main advantage is that your domain devices will already trust your enterprise CA so there isn’t much work required there and in all fairness it doesn’t take long to request and upload the new certs. You’re still going to run into issues on devices that aren’t a part of your domain and will have to find another way of making them trust the CA but this wasn’t an issue in this case. - Use public CA.
Most devices should already trust certificates issued by public CA so regardless of weather your devices are domain members or not you shouldn’t need to do anything special. The only downside here is the cost as you’ll need a minimum of 4 certificates and possibly more if you’re going for cluster configuration as each server will need a signed certificate.
Cisco recommend options 2 and 3. If you decide to go down the self signed route there are 2 methods to get your clients to trust these certificates:
- Get your users to accept the certificate warnings when they sign into the Jabber client for the first time. This imports the server certificates to the Enterprise Trust Store on the device.
- Run a scrip (perhaps as part of your logon script) to import these. You’ll need to download all four server certificates and place them in a network share accessible by the users. The script should look something like this:certutil -f -addstore “trust” “\\server\certs\cert1.cer”
certutil -f -addstore “trust” “\\server\certs\cert2.cer”
certutil -f -addstore “trust” “\\server\certs\cert3.cer”
certutil -f -addstore “trust” “\\server\certs\cert4.cer”If you’re unsure which certificates you need just sing in to the Jabber client and accept all warnings. Then look at the Enterprise Trust Store on your computer.
Using Enterprise CA to sign certificates
As I said before the method I have experience with is using a private CA and that’s the scenario I’m going to focus on. Assuming all the DNS configuration is in place you need to get a CSR generated for each required certificate and then submit these to your Enterprise CA.
| Server | Certificate |
|---|---|
| Cisco Unified Communications Manager IM and Presence | TomcatXMPP |
| Cisco Unified Communications Manager | Tomcat |
| Cisco Unity Connection | Tomcat |
If you’re running the servers above in a cluster set up you need to sign certificates for all of them.
Before the XMPP CSR is generated the following needs to be done on the server:
- Open the administration interface for your presence server, either the Cisco Unified CM IM and Presence Administrationinterface or the Cisco Unified Presence Administration interface.
- Navigate to System > Security > Settings.
- Locate the XMPP Certificate Settings section.
- Specify the presence server domain in the Domain name for XMPP Server-to-Server Certificate Subject Alternative Name field. The part of users’ logon name after the @ sign (user@yourdomain.com)
- Check the Use Domain Name for XMPP Certificate Subject Alternative Name check box.
- Click Save.
- Restart XCP Router in order for the change to take effect.
I’m not the person to go to on how to generate the CSRs so just borrowing from the Cisco article.
Generate a CSR
Note: This example is for CUCM Version 8.x. The process might vary between servers.
- Navigate to Cisco Unified OS Administration.
- Choose Security > Certificate Management.
- Click Generate CSR, and choose Tomcat from the drop-down list.
- Click Generate CSR, and click Close.
- Click Download CSR, and choose Tomcat from the drop-down list.
- Click Download CSR, and save the file.
- Send the .csr file to be signed by your Private CA Server or a Public CA.
Request a certificate
- Browse to https://<yourinternalCA>/certsrv
- Click on Request a certificate, then Submit an advance certificate request.
- Create and submit a request to this CA
- Select Web Server template and paste in the contents of the CSR file.
- Submit the request and then download the certificate chain.
You’ll be selecting the web server template for each certificate even the XMPP one.
Now upload each newly signed certificate chain under Security > Certificate Management. You’ll need to restart the tomcat service and the XCP router after the upload for the servers to start using their new certificates.
If you’ve previously accepted the certificate warnings on your test PC you’ll need to delete them manually from the Enterprise Trust Store in order to properly test your certificate verification. When you sign in on a new PC now you shouldn’t get any warning at all.
I intended a more concise and clear variation on the original Cisco article but I’m not too sure I’ve completely succeeded – feel free to leave me a comment.
How to stop spammers emailing you….or not
This isn’t an overly informative post, just something that made me chuckle. I was dealing with a spam issue for one of my customers which lead to them being blacklisted and all sorts. While getting rid of a ton of bounce backs I noticed a reply that I just had to share.
Creating AD users from a CSV file
I must be in scripting mood lately. Here we have a belated Christmas present in the form of a powershell script to create users from a csv file.
Again I have butchered somebody else’s script so if you’d like the unobliterated version head over to http://gallery.technet.microsoft.com/office/AD-and-mailbox-from-CSV-96a4713f – thanks Rahmat!
My own addition is the little waiting and checking section in the middle as I sometimes had the mailbox creation fail as it couldn’t see the user yet.
I’ve also added a section for creating home drives as for some reason when you assign the home folder location during the AD user creation it only adds the AD property but doesn’t actually create the folder.
For my purposes the CSV has the folowing headers:
LastName,FirstName,Username,Title,Password,OU,Database
But you could add more as needed and use in the script:
#############################################################################
# New-UserAD and Email + Home Folder
# Create email and AD Account for new Users in Contoso.com
#
# ============================================================================
$date = Get-Date
#Set up Log files for output
$ErrorLog = “C:\PS\Errorlog.txt”
$SuccessLog = “C:\PS\Successlog.txt”
Add-Content $SuccessLog “————————————————————————————————-”
Add-Content $SuccessLog $date
Add-Content $SuccessLog “————————————————————————————————-”
Add-Content $ErrorLog “—————————————————————————————————-”
Add-Content $ErrorLog $date
Add-Content $ErrorLog “—————————————————————————————————-”
## Create Session with Exchange 2010 change your URI address
$s=New-PSSession -ConfigurationName Microsoft.Exchange -ConnectionUri http://EXCHANGESERVER/powershell -Authentication Kerberos
## Add AD Cmdlets
Import-Module ActiveDirectory
#Import CSV
$csv = @()
$csv = Import-Csv -Delimiter “,” -Path “C:\PS\newADuserList.csv”
#Get Domain Base
$searchbase = Get-ADDomain | ForEach { $_.DistinguishedName }
#Loop through all items in the CSV
ForEach ($user In $csv)
{
## change your OU with your own OU
$OU = $User.’OU’
$Password = $User.Password
$title= $user.’Title’
$lastname= ($user.’LastName’.Substring(0,1).toupper() + $User.’LastName’.Substring(1).tolower())
$Detailedname = $User.’FirstName’ + ” ” + $lastname
$UserFirstname = $User.’FirstName’
$SAM = $User.’Username’
$UPN= $SAM + “@YOURDOMAIN.COM”
$Displayname= $User.’Username’
$Dis= $User.’title’ + ” ” + “$Detailedname”
$group= “ADGROUPS TO INCLUDE USER IN”
$homedrive= $User.HomeDrive
$logonscript= “LOGON SCRIPT PATH”
$database= $User.’Database’
#Check if the User exists
$NameID = $user.’Username’
$User = Get-ADUser -LDAPFilter “(SamAccountName=$NameID)”
If ($User -eq $Null)
{
#Create the User if it doesn’t exist
$create = New-ADUser -Name $SAM -SamAccountName $SAM -UserPrincipalName $UPN -DisplayName $Displayname -Path $OU -GivenName $UserFirstname -Surname $lastname -AccountPassword (ConvertTo-SecureString $Password -AsPlainText -Force) -Enabled $true -Description $Dis -HomeDrive Z: -HomeDirectory $homedrive -ChangePasswordAtLogon $true;
do
{
#Wait for bit as sometimes the user creation takes a little while to take effect
sleep -seconds 3
$accountExists = get-ADUser -LDAPFilter “(SamAccountName=$SAM)”
Write-Host “.” -nonewline
} while ($accountExists -eq !$Null)
Write-Host “AD Account $Detailedname created!”
add-content $SuccessLog “User $SAM created Sucessfully.”
## Adding User to Group
Add-ADPrincipalGroupMembership -Identity $SAM -MemberOf $group
Write-Host ” Added to Groups Needed”
add-content $SuccessLog “AD User $SAM Added to groups Sucessfully.”
Write-Host -ForegroundColor Green $SAM
### Create Homedrive
# Assign the Drive letter and Home Drive for the user in Active Directory
$HomeDrive=’Z:’
$UserRoot=’\FILESERVER\USERSHARE\’
$HomeDirectory=$UserRoot+$SAM
SET-ADUSER $SAM –HomeDrive $HomeDrive –HomeDirectory $HomeDirectory
# Create the folder on the root of the common Users Share
NEW-ITEM –path $HomeDirectory -type directory -force
$Domain=’YOURDOMAIN’
$IdentityReference=$Domain+’\’+$SAM
# Set parameters for Access rule
$FileSystemAccessRights=[System.Security.AccessControl.FileSystemRights]”FullControl”
$InheritanceFlags=[System.Security.AccessControl.InheritanceFlags]”ContainerInherit, ObjectInherit”
$PropagationFlags=[System.Security.AccessControl.PropagationFlags]”None”
$AccessControl=[System.Security.AccessControl.AccessControlType]”Allow”
# Build Access Rule from parameters
$AccessRule=NEW-OBJECT System.Security.AccessControl.FileSystemAccessRule -argumentlist($IdentityReference,”FullControl”,”ObjectInherit, ContainerInherit”,”None”,”Allow”)
# Get current Access Rule from Home Folder for User
$HomeFolderACL=Get-ACL $HomeDirectory
$HomeFolderACL.AddAccessRule($AccessRule)
SET-ACL –path $HomeDirectory -AclObject $HomeFolderACL
## Creating Mailbox on EX2010
Enable-Mailbox -Identity $SAM -Alias $SAM -Database $database
## Set Dial in Properties
set-aduser $SAM -replace @{msnpallowdialin=$true}
## Set Dial in Properties
set-aduser $SAM -replace @{msnpallowdialin=$true}
Add-Content $SuccessLog “—————————————————————————————————-”
}
Else
{
## If user already exists unlock and enable user account and log message in error log.
Unlock-ADAccount -Identity $SAM
Enable-ADAccount -Identity $SAM
Write-Host -ForegroundColor Red “AD User $SAM already exists. Account unlocked.”
add-content $ErrorLog ” User Already exist : $Detailedname. Account unlocked”
Add-Content $ErrorLog “—————————————————————————————————-”
}
}
