This week I’ve ventured out of my comfort zone while helping out with the Microsoft side of things on a Cisco Jabber project. First of all I’d like to point you to this document: Jabber Complete How-To Guide for Certificate Validation. While not the clearest of all it does contain everything you need to know. I had to read it a couple of times to completely understand what needs to be done so here is my own summary.
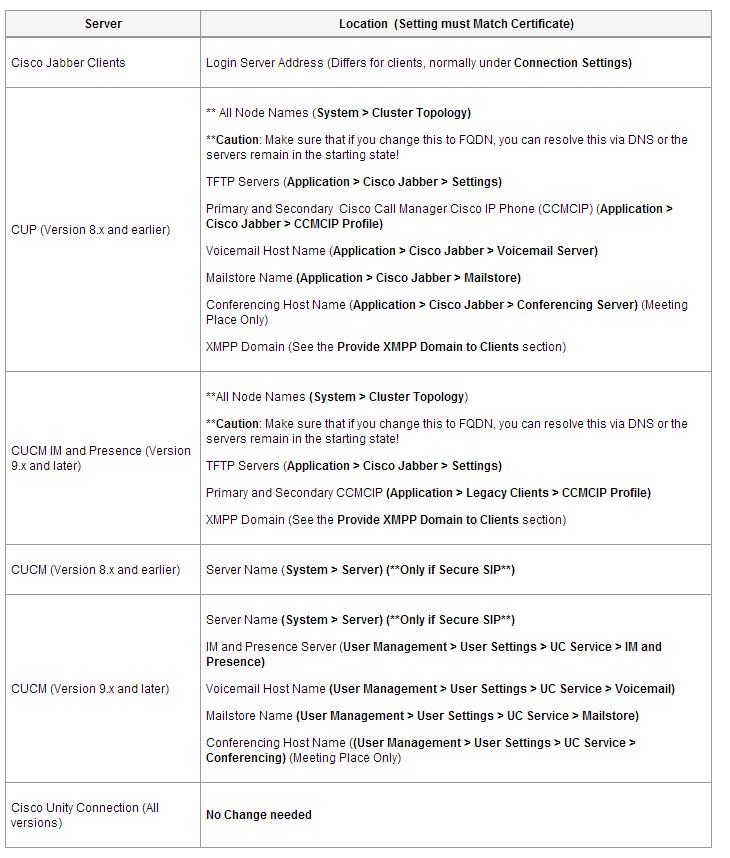
You can take three approaches with certificates but whichever method you go for to have any chance of the certificate being verified by the client device you need to make sure you have A records created for each server and then using the FQDN rather than IP addresses in a fair few places as listed in the Cisco article. Otherwise you’d end up with a mismatch between the server address and the certificate.
Source: http://www.cisco.com/c/en/us/support/docs/unified-communications/unified-presence/116917-technote-certificate-00.html
- Use the default self signed certificates from each server (Cisco Unified Communications Manager IM and Presence, Cisco Unified Communications Manager,Cisco Unity Connection).
This is quite simple as you don’t need to generate any new certificates at all. You just need to find a way of making your devices trust these.
- Use private CA to sign the certificates.
This is the route we went down. The main advantage is that your domain devices will already trust your enterprise CA so there isn’t much work required there and in all fairness it doesn’t take long to request and upload the new certs. You’re still going to run into issues on devices that aren’t a part of your domain and will have to find another way of making them trust the CA but this wasn’t an issue in this case.
- Use public CA.
Most devices should already trust certificates issued by public CA so regardless of weather your devices are domain members or not you shouldn’t need to do anything special. The only downside here is the cost as you’ll need a minimum of 4 certificates and possibly more if you’re going for cluster configuration as each server will need a signed certificate.
Cisco recommend options 2 and 3. If you decide to go down the self signed route there are 2 methods to get your clients to trust these certificates:
- Get your users to accept the certificate warnings when they sign into the Jabber client for the first time. This imports the server certificates to the Enterprise Trust Store on the device.
- Run a scrip (perhaps as part of your logon script) to import these. You’ll need to download all four server certificates and place them in a network share accessible by the users. The script should look something like this:certutil -f -addstore “trust” “\\server\certs\cert1.cer”
certutil -f -addstore “trust” “\\server\certs\cert2.cer”
certutil -f -addstore “trust” “\\server\certs\cert3.cer”
certutil -f -addstore “trust” “\\server\certs\cert4.cer”If you’re unsure which certificates you need just sing in to the Jabber client and accept all warnings. Then look at the Enterprise Trust Store on your computer.
Using Enterprise CA to sign certificates
As I said before the method I have experience with is using a private CA and that’s the scenario I’m going to focus on. Assuming all the DNS configuration is in place you need to get a CSR generated for each required certificate and then submit these to your Enterprise CA.
| Server |
Certificate |
| Cisco Unified Communications Manager IM and Presence |
TomcatXMPP |
| Cisco Unified Communications Manager |
Tomcat |
| Cisco Unity Connection |
Tomcat |
|
|
If you’re running the servers above in a cluster set up you need to sign certificates for all of them.
Before the XMPP CSR is generated the following needs to be done on the server:
- Open the administration interface for your presence server, either the Cisco Unified CM IM and Presence Administrationinterface or the Cisco Unified Presence Administration interface.
- Navigate to System > Security > Settings.
- Locate the XMPP Certificate Settings section.
- Specify the presence server domain in the Domain name for XMPP Server-to-Server Certificate Subject Alternative Name field. The part of users’ logon name after the @ sign (user@yourdomain.com)
- Check the Use Domain Name for XMPP Certificate Subject Alternative Name check box.
- Click Save.
- Restart XCP Router in order for the change to take effect.
I’m not the person to go to on how to generate the CSRs so just borrowing from the Cisco article.
Generate a CSR
Note: This example is for CUCM Version 8.x. The process might vary between servers.
- Navigate to Cisco Unified OS Administration.
- Choose Security > Certificate Management.
- Click Generate CSR, and choose Tomcat from the drop-down list.
- Click Generate CSR, and click Close.
- Click Download CSR, and choose Tomcat from the drop-down list.
- Click Download CSR, and save the file.
- Send the .csr file to be signed by your Private CA Server or a Public CA.
Request a certificate
- Browse to https://<yourinternalCA>/certsrv
- Click on Request a certificate, then Submit an advance certificate request.
- Create and submit a request to this CA
- Select Web Server template and paste in the contents of the CSR file.
- Submit the request and then download the certificate chain.
You’ll be selecting the web server template for each certificate even the XMPP one.
Now upload each newly signed certificate chain under Security > Certificate Management. You’ll need to restart the tomcat service and the XCP router after the upload for the servers to start using their new certificates.
If you’ve previously accepted the certificate warnings on your test PC you’ll need to delete them manually from the Enterprise Trust Store in order to properly test your certificate verification. When you sign in on a new PC now you shouldn’t get any warning at all.
I intended a more concise and clear variation on the original Cisco article but I’m not too sure I’ve completely succeeded – feel free to leave me a comment.