I have been involved in a small migration project over the last couple of months and will be sharing my notes. In all fairness most of this comes from Microsoft guides which are pretty good and comprehensive. What I’ll be sharing is a rather condensed version so you might want to read through the original articles before undertaking your own migrations.
First up is the network policy server migration which is very straight forward.
NPS Migration Steps
Preparation
Preparing the source server:
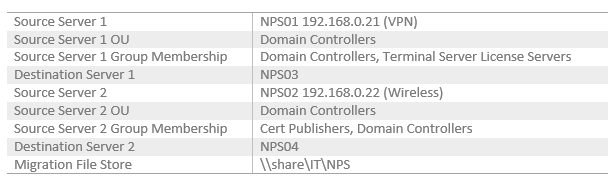
- Gather information for the table above.
Preparing the destination server:
- Configure new server OU and group membership identical to the source.
- Install NPS role service.
Exporting settings from the source server (Windows Server 2008)
- On the source server open elevated command prompt and run:
netsh nps export filename=”\\share\IT\NPS\file.xml” exportPSK=YES
Importing settings to the destination server:
- On the destination server open elevated command prompt and run:
netsh nps import filename=”\\share\IT\NPS \file.xml”
Verifying the NPS migration
Source: https://technet.microsoft.com/en-us/library/dn530780.aspx
- Check that NSP is running on the destination server:
- In elevated command prompt run: sc query ias
- In the command output, verify that RUNNING is displayed next to STATE.
- Verify NPS config has been migrated:
- netsh nps show config
- Verify that the destination server is not using default NPS settings. For example, default settings display a single policy under Connection request policy configuration with the name Use Windows authentication for all users.
- Verify that NPS console is displaying correct settings
- Using the NPS console navigate to Policies, RADIUS clients and servers…etc to make sure settings are displayed as expected.
- Verify Authentication methods:
In this case NSP02 uses certificate based EAP methods, the destination server might already be provisioned with a suitable certificate through autoenrollment. You might also be required to manually enroll the destination server with a computer certificate.- To view the certificates associated with EAP methods on CAE-WT-DC02, open the NPS console.
- Open Policies → Network Policies → Wireless Users Services/Wireless Users General.
- Check the Constraints tab.
- Click Authentication Methods, and then under EAP Types click Microsoft: Protected EAP (PEAP).
- Click Edit, verify that the correct certificate is chosen next to Certificate issued or Certificate issued to, and then click OK.
- Verify client connections:
- On the destination servers In the event viewer console tree, open Custom Views\Server Roles\Network Policy and Access Services.
- In the details pane, verify under Event ID that event number 6272 is displayed.
- Events 6273 or 6274 indicate that client authentication attempts are unsuccessful.
- If no events are displayed, client connection requests are unable to reach the destination server, or the server is not logging authentication attempts.
Notes:
Migration file store – you can of course export the file locally on the source server and then manually copy over.
DNS and IP addresses – Depending on how your radius clients connect to the NPS server for authentication you might want to assing the same IP addresses to the new servers, update your DNS records accordingly or update each radius client separately.
